Showing posts with label easy process of windowsXP installation. Show all posts

Thursday, 22 December 2011

How To Increase Computer Speed


Computers runs different files upon start up. Some of them are unnecessary. Some of them are just junk. But do you want to find a way on how your computer be able to start in just a matter of seconds? This Post will demonstrate you how to increase your computer start up speed.

1. Keep Your Hard Disk Clean

Keeping your hard disk clean from unnecessary files can be a big help on improving your computer start up speed. It's like keeping your engine clean for it to be able to run flawlessly. This technique will keep your hard disk clean.

Click on Start >> Programs >> Accessories >> System Tools >> Disk Cleanup

Delete Temporary Internet Files, Chkdsk files, Temporary files and Old Compress files

2. Download Tune Up Utilities 2010

This computer utility software is just incredible. You can customize, speed up your internet speed, speed up your computer functionality, computer start up speed, Turbo Mode, Live Optimization, Fix Problems, and more.

3. Uninstall Useless Programs

Check all the installed programs and view their Status. Of a particular application displays Used: Rarely, then it is a good idea to remove it. This will free up a lot of disk space as well as speed up your computer.

Go to Start >> Control Panel >> Add or Remove Programs

4. Disk Defragmentation

Disk Defragmentation increases your computer speed dramatically. Though it takes time to finish the defragmentation, Disk Defragmenter is a tool that rearranges the data on your hard disk and reunites fragmented files so your computer can run more efficiently.

To run defragmenter, go to Start >> All Programs >> Accessories >> System Tools >> Disk Defragmenter Click "Analyze" in order to determine if you need to defragment a particular drive and estimated time required. Click "Defragment" to start the defragmentation process. This normally takes a long time so I would recommend doing this when you do not need to work on your computer for 1-2 hours.

5. Modify Windows Start Up

This is the most effective technique of speeding up your computer start up speed.

Go to Start >> Run... In the run window, enter "msconfig" (without quotes) and then hit enter. You need to take precaution while performing this step.

Go to "Startup" tab and deselect the programs that you do not want to start at windows startup. Once you are satisfied with your selections, click "Apply".
Hope this Helps. 

Post Source: http://EzineArticles.com/5320186

Tuesday, 29 November 2011

How to Block Websites from your Computer without using any Software.


Step 1: Open “Run” from the start menu, Just copy paste the following path and hit ENTER.

notepad c:\WINDOWS\system32\drivers\etc\hosts

Step 2: When this hosts file is opened in Notepad, at the end of the file you will see something like “127.0.0.1 localhost”.

Step 3: Under “127.0.0.1 localhost” just add another website URL that you want to block.

For Example:- 
127.0.0.1 localhost
127.0.0.2 www.google.com
127.0.0.3 www.Yahoo.com

Step 4: Make sure every time you add another website, the last digit of the address 127.0.0.x should not be the same.


Save the file and exit.
So, here you go.
Restart your browser if it is opened and changes will take place immediately.
You can block as many websites as you like with the above technique.
If you want to remove the ban later, open the same file as mentioned in Step 1 and delete the above lines.

Thursday, 10 November 2011

How To Install Drivers.

There are 2 ways to install a driver. One through setup & 2nd manually; Following instructions are for manually installing driver:

  1-  Right click on "my computer"
  2-  Choose "properties"
  3-  Choose "device manager" (In Windows 2000 ),
       you have to choose  the "hardware" tab first and then "device manager"). 
       This will display a list of the devices that are on your computer.
  4-  Right click on the device and click  "properties".
  5-  Choose "driver" and click "update driver"
  6-  You will be asked to browse for the new driver

           Thanks Best Of Luck

Thursday, 27 October 2011

Importance Of Windows XP


Windows XP  is a most common operating system using in the world & use on personal computers, including home and business desktops, laptops and media centers.  It is a much easier & improved version of Microsoft then all other versions like ( WinMe,Win Vista, Win7 ) Mostly or can be say that every people knows how to operate or how to install Windows XP, Windows XP, the successor to Windows 2000 and Windows Me,  its main advantages over ME were stability and Internet connectivity. ME proved to be a somewhat unstable system and was quickly losing the public's favor. Windows XP solved these problems by being much more stable and continuing the trend that Microsoft had started in Windows 98 of making connection to the Internet and other networks simpler. Microsoft releases service packs for its Windows operating systems to fix problems and add features. Each service pack is a superset of all previous service packs and patches so that only the latest service pack needs to be installed, and also includes new revisions, Service pack 2 offered many security improvements over the initial version of the operating system. Eventually, Service pack 3 would speed the system up a little, but it never got back to its release speed. Windows XP is a complete GUI (graphical user interface ) operating system, a graphical user interface is a type of user interface that allows users to interact with electronic devices with images rather than text commands. But in the end will be just said that Windows XP was a great effort & nice product of microsoft that it was a best solution for every person & for every desktop computers can use any one easily.

Wednesday, 19 October 2011

How to install Windows XP


Microsoft Windows is also a type & series of operating systems which produced by microsoft in November 20, 1985 to growing the intrest in graphical user interfaces (GUIs).

Now we will learn you here that how to install windows XP its a very simple & easy, Before you perform the installation i recommend  you to check Windows XP compatibility list to ensure that your hardware is supported by XP or not. If your hardware is not on the compatibility list you can check your hardware manufactures website to download the drivers for Windows XP. Save all the necessary drivers on to USB bus or any CD before you start the installation.
There are all versions of Windows XP CD are bootable. In order to boot from CD/DVD-ROM you need to set the boot sequence. Look for the boot sequence under your BIOS setup and make sure that the first boot device is set to CD/DVD-ROM. You can then perform the following steps to install Windows XP.

Step 1 – First start your computer  & place your Windows XP CD in your CD/DVD-ROM drive. Your computer  should automatically detect the CD and you will get a message saying "Press any key to boot from CD". Soon as computer starts booting from the CD your will get the following screen, & during this screen quickly press any key of your keyboard to start windows installation.


Step 2 – After it you will get a Windows XP Professional Setup screen. Here are the options to install a new Windows, Repair previous windows or quit. As we are installing a new windows we just press Enter to continue.


Step 3– In this step you will be shown the end user licensing agreement. Press F8 to accept and continue.


Step 4 - This is an important step. Here we will create the partition where Windows will be installed. If you have a brand new unformatted drive you will get a screen similar to below. In our case the drive size is 8190MB. We can choose to install Windows in this drive without creating a partition, hence use the entire size of the drive. If you wish to do this you can just press enter and Windows will automatically partition and format the drive as one large drive.
For this demonstration I will create two partition. The first partition will be 6000MB (C: drive) and second partition would be 2180MB (D: drive). By creating two partition we can stores Windows and Applications and in other we can stores our data. So in the future if anything goes wrong with our Windows install such as virus or spyware we can re-install Windows on C: drive and our data on E: drive will not be losted. Please note you can choose whatever size partition you like. For example if you have 500GB hard drive you can have two partition of 250GB each.
Press C to create a partition.


Step 4- Windows will show the total size of the hard drive and ask you how much you want to allocate for the partition you are about to create. I will choose 6000MB. You will then get the screen below. Notice it shows C: Partition 1 followed by the size 6000 MB. This indicates the partition has been created. We still have an unpartitioned space of 2189MB. Next highlight the unpartitioned space by pressing down the arrow key. Then press C to create another partition. You will see the total space available for the new partition. Just choose all the space left over, in our case 2180MB.


Step 5 - Now you will see both partition listed. Partition 1 (C: Drive) 6000MB and Partition 2 (D: Drive) 2180MB. You will also have 8MB of unpartitioned space. Don't worry about that. Just leave it how its is. Windows normally has some unpartitioned space. You might wonder what happened to E: drive. Windows has automatically allocated E: drive to CD/DVD-ROM.
Select Partition 1 (C: Drive) and press Enter.


Step 6 - Choose format the partition using NTFS file system.This is the recommended file system. If the hard drive has been formatted before then you can choose quick NTFS format. We chose NTFS because it offers many security features, supports larger drive size, and bigger size files.


Step 7 - Windows will now start formatting drive C: 


Step 8 - And after formatting drive C it will automatically start copying setup files as shown on the image below :


Step 9 - After the setup has completed copying the files the computer will restart. Leave the XP CD in the drive but this time DO NOT press any key when the message "Press any key to boot from CD" is displayed. In few seconds setup will continue. Windows XP Setup wizard will guide you through the setup process of gathering information about your computer.


Step: 10 – During 33 minutes remaining it will show a dialouge box to Choose your region and language.


Step 11 - Type your name and organization here.


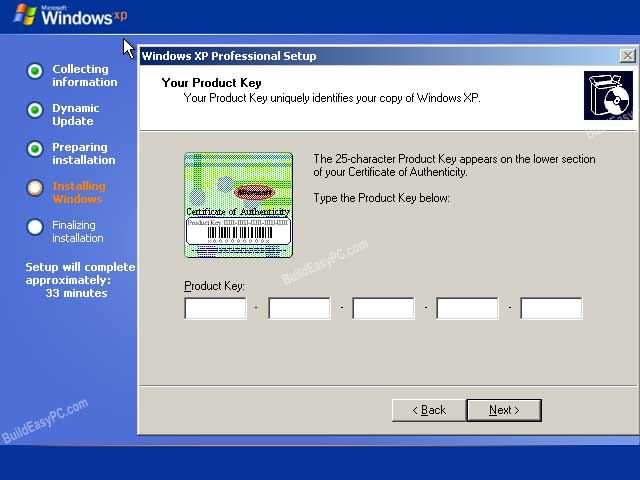
Step 12. Enter your product key here.


Step 13Write here the computer name, and enter an Administrator password. Don't forget to write down your Administrator password for login security purpose.


Step 14Enter the correct date, time and choose your time zone.


Step 15 - For the network setting choose typical and press next.


Step 16 - Choose workgroup or domain name. If you are not a member of a domain then leave the default settings and press next. Windows will restart again and adjust the display.


Step 17In the end Windows will start and present you with a Welcome screen. Click next next to continue for further steps.


Step 18. Log in, to your PC for the first time.


I hope you will like this informative post & any one who don’t know to install windows XP can learn easily how to install windows XP with help of this post. if any sugession any query please feel free to write down in comment box.Thanks
Thanks to buildeasypc.com